Progress Report: February

So, now that my goal is to motor through the film shot by shot and get it done (but without rushing it, of course), I’m going to publicly declare my progress here, to keep myself motivated and to assess where I’m at.

I have a new deadline now, and it’s one that I have to stick to.  The kind people at Bravo!FACT have given me an extension, and now my deadline is October 1st, 2010.  That is 7 months away.  It sounds far off, but I think it will be a perfect amount of time to get everything done, if I stay focused, and ask for a bit of help here and there.

I’ve divided the film into sections, to make it more manageable, and to help myself keep up with a steady, manageable pace.  Each month I have to complete one section of the film.  There are a total of 27 shots.  Here’s how I’ve broken them up:

February:

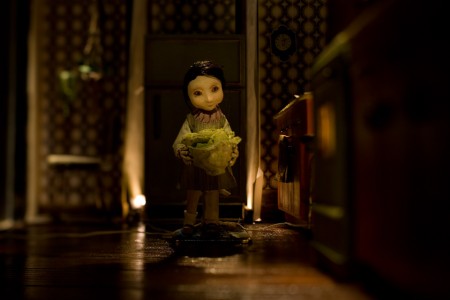
My Feb goal was to complete the section where Sabela is introduced, and the cabbage gets put into the soup pot.  This section consists of 8 scenes:  scenes 13-20.  So far I’ve shot 6/8.  (Three of them were shot last year.)  The next shot — scene 18 — is prepped and will be finished off today.  I’m a little behind, in that the final scene of this section will take some time to plan…  but that’s not a big deal, as I’m also a little ahead on my March goals.

March:

In March I plan to shoot scenes 21-24.  These will require new props to be built, as the sequence consists of overhead shots of the cabbage soup pot.  I need to be able to show boiling water, with cabbage leaves floating around in them.   My current little stovetop pot is made of copper pipe, so its diametre is only about 1 1/4 inches… not enough room to animate in.  So I’ll need to build a new, larger set for these scenes — well, just a larger version of the pot, stovetop, and countertop.  AND I’ll need to experiment with Mike Brent’s and Shelley Noble’s advice regarding animated “water.”

April:

This month I’ll work on scenes 2-7.  In these six scenes, not too much happens — just a lot of intricate closeups of the cabbage and set, which will alow for some space for graphics.  This will be a time to heavily experiment with lighting and camera work, because the scenes will be so minimal (compared to the kitchen scenes I’m shooting now.)

May:

May will be the month I will fear and sweat over.  I will need to animate not one, but FOUR characters, AND animate a new “set” coming on to the stage.  These are the scenes where we introduce Sabela’s family, who are seated in the dining room.  Scenes 25-27.

June:

At this point I can return all my rented equipment!  Hurray.  Now all the animation switches over to some more experimental techniques that I have in mind.  (Well, they are experimental for me.  They have probably been done before.)   They involve some ink and a projector, and that’s all I’ll say for now :)  These are scenes 8-12.

July:

July will be more of the ink / experimental animation, plus some compositing, stabilization and tracking, rig removal, etc.

August:

This month will be time to design and composite all the graphics.  Remember, the film is based on a Galician poem, so there will be many words to incorporate visually, to help translate the poem.  Also, this month I’ll work on the title graphics and title animation, which I’ve counted as Scene 1.

September:

September will be time to record audio, and finish any last post-production things.  There is a bit of padding here; I don’t think the audio sessions will take a month or anything… but I will probably need extra time for things I’ve left out, or underestimated the timing of.

October 1st:

Send everything off to Bravo!FACT!

And celebrate!

And tell everyone when it will be on TV!

By the way, I am REALLY happy with how my walk cycle shot turned out — the one with the tilt shift lens — and my little closeup that I showed the lighting for, below.  My dilemma now is… how much of the film should I show?  I would like to keep some mystery to the final film, and not just show it shot by shot!  I’m sure Bravo would not be thrilled with that, either.  PLUS the shots I’m showing are unfinished and rough.  Not sure yet.  What do you think?…  (Though to be honest there are only about five people reading this blog… hi Shelley and mom!  😉

I joke.)

I’m very happy ALL you guys are reading, BTW!  🙂

Shift and Tilt

I feel kinda funny talking about cameras and lighting, because it’s one area (among many others) where I’m still learning.  I’ve learned everything I know, pretty much, from Marcus, including the trick of shooting with the camera upside-down, which was mentioned in the last post.

But, I’m going to talk about cameras and lighting anyway.  For this next shot, I’m messing around with the 2nd of my two lenses, which is a 45 mm tilt / shift lens.  I bought this lens because I like the wonky focus effects they allow for, and because it has the flexibility to be used as a normal 45 mm lens when the tilt / shift is set to 0.  My other lens is the 100mm macro, which definitely comes in handy for any kind of closeup.  The camera can be far away, yet appear to be close, allowing for a lot of room to work on the closeups.  (See the photos in the last post, and you’ll see how close up the puppet was in frame vs. how far away the camera was.)

For my next shot, the camera is in almost exactly the same position, yet this tilt / shift lens allows for a much wider shot.  Just for fun, I started playing around with the tilt function of the lens.

As far as I understand it, the main advantage tilt shifts have over regular lenses is in the tilt function, which allows you to create a non-parallel focal plane.  That is, with regular lenses, the plane of focus is always going to be parallel to the camera.  With a shallow depth of field, everything in the foreground is blurry, then there is a narrow mid-plane where things are in focus, and then everything in the background is blurry as well.  (Or, wherever you chose your plane of focus to be, will be a narrow window parallel to the window of the framing of the image.)

With the tilt function of the tilt / shift lens, the focal plane can be set at a diagonal — at any angle  you want.  There is no limitation of foreground / middleground / background planes.  My lens rotates so that the tilt doesn’t even have to be left-right, but it can be up-down, or anywhere in between.  The focal plane can be extremely angled, or angled just slightly.  This means you can chose exactly which elements in the scene that you want to be in focus, while throwing everything else out of focus.  Here’s a left-right extreme tilt example:

vs.

Note:  the plant and chair in the background to the left of Sabela, and the clock on the wall to the right of her.  In the first image, the chair and plant are in focus, while Sabela and the foreground stove are also in focus.  The focal plane is running at a diagonal from the back left to the front right of the scene, intersecting Sabela’s position.

In the second image, the clock and back cabinets are in focus, as well as Sabela.  The focal plane is moving from the back right to the front left.  You can see this most clearly on the floor.

Just for fun, I put together a little clip of this focal plane tilt happening in stop motion.  I wish I was crazy enough to try this while animating the puppet, but it’s actually quite tricky to animate smoothly, for one.  The tilt / shift would be very awkward to create a reference scale for.  And the focus needs to be changed manually, too.  With the puppet moving through frame as well, my head might just explode with the attempt to keep it all happening.

But, because I am just *slightly* crazy, I am going to try it out with a test walk cycle, to see how impossible it is.

Here it is happening with no puppet animation, where the lens is wide open for a shallow DOF, and the lens is tilting from one extreme to the other:

Kind of a strange effect, because it seems like the camera is panning a little, but it is not.  The only element moving here is the lens.

I will definitely be using this effect at some point in the film.  Who knows, maybe it’ll even happen in this walking shot.  😮

There is a really good explanation of tilt shift photography on Wikipedia, in case you care to learn more about it.

The Big Climb, and Some Underlighting

Last week I shot the next scene on the list, scene 19.  I picked a relatively easy one to start with, because I need to ease my way back into the project slowly… How easy it is to forget everything and lose momentum.

Anyway, in case you have also forgotten what scene 19 was all about, I’m filling in the shots outlined in this previous post.  I decided to go with version one of this sequence, in which Sabela examines the cabbage, and takes it over to the stove.  A simple enough set of actions… but how do we make it interesting?

So, after all the anxiety (and fun) that has gone into this project so far, I somehow decided to approach these sequences a little differently.  The previous shots here and here were very thoroughly planned… and they had to be, I think.  There was a lot happening, and because of the rig removal, I needed a repeatable sequence, so that I could create a backplate to paint out the puppet’s rigging.  Not yet sure if that idea will even work… but I got the feeling at the end of that shoot that there was a little something missing.  Maybe it lacked spontaneity?  Or could it have benefited from more walk cycle practice?  Yes, and yes.

There’s always a fine line between improvisation and practiced effort.  The balance is fine in any art form, but it seems to be particularly difficult in stop motion, because things happen so slooowwwly.  I imagine improvising music, for instance, might be a very different experience than improvising animation.  When it takes an entire day to contemplate the motions that, when played out, will eventually happen in a few seconds… well, the spontaneity takes on a different flavour.

Someone once explained the physical power inherent in Tai Chi by comparing the practice to the stretching of a rubber band.  If you stretch the rubber band to its limit, and colour it with a black marker, and then release the stretch, the black ink becomes much more concentrated.  Similarly, if you practice a martial art in slow motion, with greater attention to detail of each motion, and then speed up these movements, your movements will contain more force and precision.

It’s the same with stop motion, I think.  We are slowing down each movement, studying it in its smallest, 1/24-of-a-second detail, and practicing this kind of awareness of the world.

So, to just go into a movement without much thought… well it becomes difficult.  I experimented a little with this clip (and, after all this pontification, I should remind you that I am not the best character animator in the world… usually I feel like I am just practicing) by just winging it.  I knew I wanted the little girl to end up kneeling on the stool, and I kind of knew how she might get there, but I didn’t practice it beforehand, or do much planning (other than pretending that I was climbing a stool myself, to see how I would do it.)  One step followed the next, and somehow she ended up on top of the stool.  Whew!

I had a couple of problems with the animation — one of course is that she is supported from above, so there was nothing grounding her feet as she climbed.  The foot that her body is supposed to be weighted on was sliding all over the bar stool lower rung, and the only way I could really make it still was by toggling between frames until it lined up (more or less) with the previous frame.  This made her movements rather imperfect… But these days I am embracing imperfection, and just going with the flow.  She managed to go from A to B, and I find the pause in between kind of cute.

In the name of spontaneous animation, I am 95% resolved to do only one take for the remaining shots left of the film.  We’ll see how that goes.

Anyway, here is the (very short) clip:

Another thing I did last week was set up the lighting and camera for the next shot.  I’m quite proud of the way this turned out, because, though I’m using Marcus’ previous lighting setup, I modified it to suit the camera angle myself.  I put together a little animated clip of all the test shots, so you can see the progression.  Hopefully I can remember more or less the thought process that went into these decisions:

Unfortunately a lot of the nice details are lost here in the YouTube compression…  I’m still in the process of figuring out what to do about this, but I’ll probably switch everything over to vimeo soon…

Anyway, the breakdown:

  1. Here the lights are pretty much as they were in the previous shot, which was taken from an angle perpendicular to this.  Therefore the fridge behind her is in shadow, and the front of the cabinets aren’t lit very well.  She is being blasted by a single light — the overhead Dedo with the projection lens.  This light seems bright, but I’m not sure what to do with it yet.
  2. She is also looking a little scary when lit this way.  I try repositioning her, and moving the camera a bit, to see where she is framed best, and what her best angle is.  Do I shoot from above slightly?  Or below?  Just figuring this out.
  3. Trying a different position for the Dedo that is lighting her from the front.
  4. More of the same.  Also playing around with the softbox that is lighting the cabinets — it doesn’t seem to be reaching the front doors very well.
  5. Trying a more symmetrical camera framing.  Also moving the small softbox that was lighting the side of the fridge over, so that it lights the face of the fridge a little better.
  6. Now playing around with the background lights, catching the highlights of the fridge handle.
  7. Here I try lighting Sabela from below, using those LEDs that were lighting the back stage wall before.  Interesting?  Spooky?  Not quite sure yet.  But the light is creating a little glint in her eye, which I like.
  8. Moving around the LEDs, and the puppet…
  9. Trying a far-away fresnel, heavily scrimmed and gelled, to light the fridge and countertop doors.  I feel like this washes everything in light too evenly.
  10. Nix that light.  Now it’s just the overhead softboxes (one over the counter, one over the fridge), the LEDs shining up onto the puppet, and the overhead Dedo with projection lens, which I have now tilted down so it’s just hitting the cabbage.
  11. Now we’re getting somewhere… more moving around these lights…
  12. – 18.  More of the same…

19.  I pull the two LED lights a bit further away, to make the light less dramatic

20.  I turn the overhead Dedo off, just to see what it looks like with MORE dramatic underlighting…  Also add another LED in the background, with some diffusion paper, to add a bit of interest and contrast there…

Final — voilà!  I’m liking this effect.  I have moved the cabbage lower so that it’s not creating harsh shadows on her face.  She has a nice glimmer in her eye from the reflection of these lights, and the cabbage looks good.  The background details can be picked up, but are not too prominent.  I like the shadow of her that now appears on the fridge.

I’m shooting this (purposefully) with a really shallow depth of field.  The camera is set up with a macro lens, a 100mm, set wide open — to f/4.5.

Here are some shots of the lighting and camera setup:

Here you can see the low camera angle, and the fact that it’s upside down!  Luckily Stop Motion Pro flips the image right-side-up for me 🙂

Of course, I have to set her up with proper rigging…  the clothespeg / clamp setup is just temporary.  Since we can’t see her feet in the shot, I’ll have to come up with something sturdy that will hold her legs and clamp down to the set somehow.

Here’s the overall setup.  Some lights are not really being used in this shot, but I’ve left them there for future shots in this sequence where we might see more of the set.  I’m basically just using the two overhead Dedos — one at the far right, and one at the far left of the overhead grid — as well as the two softboxes — one over the fridge, one over the countertops.

The adventure continues… thanks for reading!

Two Magical Videos, and a Question…

Land of Talk

LUIS

Just wanted to share a couple of beautiful things I’ve seen recently.

Also, I’m searching around for a good way to show video on this blog.  I’m checking out the paid version of Vimeo, which apparently shows better quality HD…  So far I’m not totally convinced that the regular (“basic” free service) quality is better than YouTube.  I’ve looked around for wordpress plugins, and nothing’s worked so far.  Continuing to experiment…

The advantages to YouTube and Vimeo are of course their social aspect.  And it’s nice to have albums and ways to sort videos, and to have them all in one place.  Anyone have any preferences / recommendations for ways to embed video in WordPress, while linking to a more social video site?  With good quality HD footage?  (I feel like that’s asking a lot!  But there must be a way…)

Chapter Vignettes: Lost for Words

I worked on a project for a friend recently that got my back in the studio building stuff again, which felt great.  I spent about a week and a half from start to finish, designing, building, and animating these titles.  At first I wanted to do them as 2d graphics in After Effects, but I’m really glad Sean pushed for the photographic / sculptural vignette solution instead.  It was much more fun to do them this way!

The film is called Lost for Words, and it’s a short for Bravo!FACT.  As is my Little Theatres project, only Sean’s is live action, and took much less time to complete!  So now it’s done, and he’s got a site and trailer happening.  Way to go, Sean!

Below, you’ll see the final sequences, complete with final audio.  Sean took the files to a colour correction studio, Alter Ego, for final colour, and this changed the images quite dramatically.  The film itself was mostly shot in a forest, and that footage had been treated with cool colours.  I was surprised to see the final treatment of the chapter titles… I had imagined them as being very warm images.  But it’s a good surprise… this treatment works perfectly with the film.  As you can see, they also brought up the contrast in the wooden type, to make the text more legible.

Here are the shots side by side:  the original, un-colour-treated image on the top, and the final treated image on the bottom.  What a difference in mood!

Chapter two (above, right) was lit using a small softbox, built by moi, using the technique described in this post.  I was very happy with the results!  The softbox is only lighting the small inset frame holding the plants.  The softbox opening was designed to fit right into the top of that box, so it’s quite small…  Otherwise these were lit by Brendan Steacy and Sean Wainsteim.

And here’s the animation.  Simple animation, but just enough to add some life, and provide a reason for some fun sound FX 🙂

(I really am back on the film.  I’ve shot one scene, and am planning the next.  Updates on these soon!  Hurray!)

I’m Back!

I tried to find a photo online of the “Men’s Clinic” subway ad that I stole the title of this post from, but unfortunately no-one has captured the image of the older guy standing ankle-deep in the ocean, with his business-suit pants rolled up, briefcase in hand, arms thrown into the air in a Victory “V.”   Oh well, it would have been an inside joke for Torontonians who ride the subway, anyway.

I’m truly sorry for neglecting this blog for so long, and more so for neglecting the film.  But I’m here to announce that I’m starting back on the film this week!  Which means there will be, once more, regular blog posts, until the film is done.  I’m making the commitment to not take on any big jobs til then, and have already turned down a couple, which was hard.  But I HAVE to finish the film.

I took on a project a couple weeks ago for my good friend Sean Wainsteim, who is also doing a short for Bravo!Fact.  His is live action, but he needed some short chapter title sequences, which I built 4 vignettes for and animated in stop-motion.  The animation is very simple, but the designs turned out looking great (in my humble opinion!).  It was a lot of fun, and it got me back into the studio again.  I’ll be posting them here next week, once his trailer is online.

In the meantime, I’m starting to sort through all my old files again.  I’ve already done a complete cleanup of the studio, which felt great, as I’d made a huge mess working on Sean’s project.  It’s a little intimidating to dive back into my own film after having had several months off, because it’s really hard to remember where I left off.  I discovered while shooting Sean’s title sequences that I’d completely forgotten everything about cameras and stop motion software and the interaction of the two.  I’d almost completely forgotten everything about lighting, though I did manage to build a small softbox.  But it’s coming back…

Thanks to everyone who’s stayed in touch (Mark, Shelley  — thanks for your beautiful card!, and DarkStrider… thanks for the info in the previous, ancient post…) and to anyone who’s still reading!

PS.  I just upgraded my WordPress account (which was not an easy undertaking…  yikes.)  So things may be a little wonky for a while.  Thanks.